Pages

Samstag, 9. November 2013

Free pattern: the innocent big knit Pacman ghost hats

Eingestellt von nanaliciouz um 05:39 3 Kommentare

Earlier this year I spotted the super delicious innocent smoothies in our supermarket and I bought one bottle of each flavor. We rarely have fruits at home because of the disgusting fruit flies. These smoothies are the best solution. They last longer than fresh fruits plus thereby I avoid fruit flies in my kitchen. ^_^ v
Since then they are my daily vitamin bombs. Mangoes & passionfruits and Strawberries & bananas are my favorites. They are so yummy and healthy!

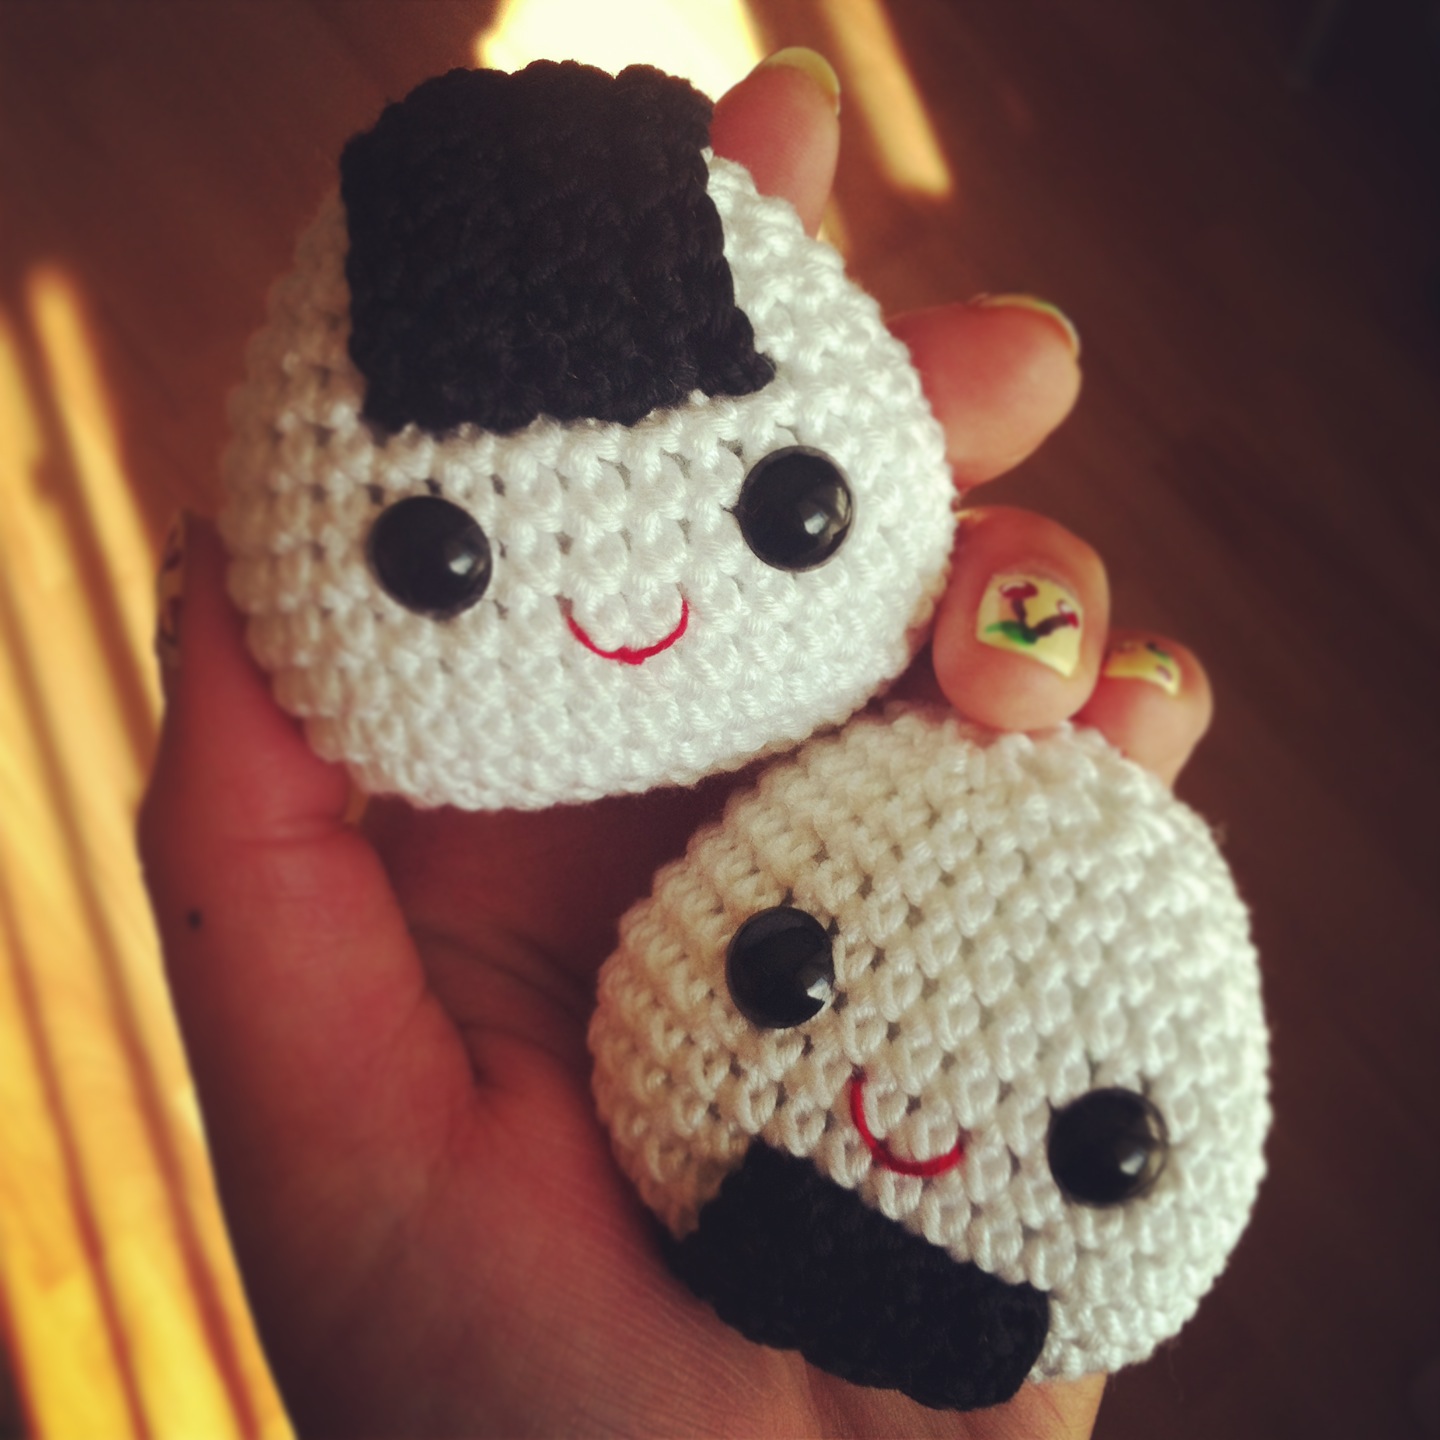
But they are not only good for you, they also help charities. Maybe some of you already have heard about "The Big Knit", (German: "Das große Stricken"). It is a yearly campaign since three years which raised money to help the elderly stay warm and healthy over the cold winter months. For every behatted bottle of smoothie sold, innocent donate an amount of money to charities. In Germany the donation will go to the German Red Cross.

This is just a great cause - I absolutely must join! However, since I do not know how to knit, I crochet tiny little hats instead. These hats won't only help the elderly, but can also be used as egg cosies later! So grab your yarn and hook and make the world a little bit better!

Here is my free pattern for all the
hard-working helpers out there: 


Materials:
  • yarn: pink for Pinky, red for Blinky, blue for Inky and orange for Clyde (I used Wolle Rödel Mille Fili Color-No. rosa 5910, rot 5902, pfefferminz 5918 and orange 5961)
  • 3.50 mm crochet hook
  • small amount of white and black felt
  • fabric glue
  • wool or tapestry needle
  • optional: stitch marker (you can use a bobby pin as a stitch marker, too!)

Stitch explanations and abbreviations:
ch chain dc double crochet
sc single crochet tr treble stitch
st stitch foll following
sl st slip stitch rem remain(s)(ing)
inc sc 2 in 1 sc rnd round 
dec sc 2 stitches togehter rep* repeat from
hdc half double crochet (X sc) number of single crochet in a round


Instruction for Pacman ghosts: Work in continuous rounds.
Beg: Begin with your favorite color. Start with a magic ring, ch 1.
Rnd 1: Work 6 sc in magic ring. Place stitch marker in first sc from beg of rnd, move marker up as each rnd is completed. (6 sc)
Rnd 2: Inc in each 6 sc around. (12 sc)
Rnd 3: Work *1 sc in next sc, then inc. Rep from *5 more times around. (18 sc)
Rnd 4: Work *2 sc in next sc, then inc. Rep from *5 more times around. (24 sc)
Rnd 5: Work *3 sc in next sc, then inc. Rep from *5 more times around. (30 sc)
Rnd 6-13: Work 1 sc in each 30 sc around. (30 sc)
Rnd 14: Work *1 sc in next sc, 1 hdc, [1 dc, 2 tr, 1 dc] in next stitch, 1 hdc, then 1 sc in next sc. Rep from *5 more times around. (48 sc)
End: Fasten off.


Finishing
1. Cut eyes and pupils out of white and black felt and glue them together.
2. Place eyes under round 6 two stitches apart and glue them on.


***This is an original pattern by ©nanaliciouz.com, 2013. All rights reserved. Please do not claim this pattern as your own. You may not in any form distribute or reproduce this pattern including images. You may keep a copy for your personal use only. Do not sell pattern and/or finished products made from this pattern without first obtaining permission from me.***

Montag, 17. Juni 2013

Oh my! So amiliciouzzz ~ !

Eingestellt von nanaliciouz um 17:44 0 Kommentare
If you follow me on Instagram you may have noticed that my last crochet posts all show amigurumi food.

In the last 2-3 months I didn't have much time for larger projects, but in my spare time I still wanted to crochet. I looked on Ravelry for small projects and I've found a handful of great free patterns. I saved them as favorites and later it turned out that I only picked out amigurumi food. :P

So my amigurumi clementine, which I made for Chinese New Year, got some buddies. They were so easy and quick to make! I really enjoy the results you get from following these patterns without spending much time and effort. Thanks to the designers for sharing them! :)


Now, here are my handmades:


Banana

Pattern by Barbara Strasser
(available as a free Ravelry download)

http://www.ravelry.com/patterns/library/amigurumi-banana

Cheeseburger

Pattern by Emjay Bailey

http://nerdigurumi.com/2011/03/amigurumi-no-sew-hamburger-or-cheeseburger.html


Hanami Dango

Pattern by me

http://nanaliciouz.blogspot.de/2013/05/free-pattern-hanami-dango-amigurumi.html


Onigiri

Pattern by Jenny Lloyd

http://www.ravelry.com/patterns/library/onigiri-couple-amigurumi-crochet-pattern


Clementine

Pattern by me

http://nanaliciouz.blogspot.de/2013/02/free-chinese-new-year-pattern.html


Little Empanada

Pattern by Deena White
(available as a free Ravelry download)

http://www.ravelry.com/patterns/library/little-empanada


Dienstag, 7. Mai 2013

Free pattern: Hanami Dango Amigurumi

Eingestellt von nanaliciouz um 16:10 0 Kommentare

Spring is here! How long have we been waiting for these longer days and longed for the heat-giving rays of the sun? The birds are back from the south and they already start twitterpating. Flowers are awakening from their winter sleep and stretching their heads skyward. Everything comes back to life, so as the beautiful cherry blossoms.

At this time Hanamis take place again in Japan. You meet up with friends for picnics and there are so much delicious food to share. And of course
Hanami Dangos should not be missed! These cute little dumplings made from machiko are eaten up quickly and that's why I have something special for you guys: here's a crocheted version of it - it'll be a nice present for your friends.
So, grab your yarn and hook and make your own bunch of Hanami dangos! Have a beautiful springtime everyone!


Materials:

  • yarn: pink (COLOR A), beige (COLOR B), mint (COLOR C) and sand (COLOR D) (I used Wolle Rödel Mille Fili Color-No. rosa 5910, natur 5952, lind 5988 and sand 5991)
  • 4.00 mm crochet hook
  • fiberfill
  • plastic safety eyes, 6 mm
  • wool or tapestry needle
  • optional: stitch marker (you can use a bobby pin as a stitch marker, too!)

Stitch explanations and abbreviations:
ch chain foll following
sc single crochet rem remain(s)(ing)
st stitch rnd round
sl st slip stitch rep repeat
inc sc 2 in 1 sc * repeat from
dec sc 2 stitches togehter (X sc) number of single crochet in a round


Instruction for Hanami Dango: Work in continuous rounds.
Beg: Begin with COLOR A. Start with a magic ring, ch 1.
Rnd 1: Work 6 sc in magic ring. Place stitch marker in first sc from beg of rnd, move marker up as each rnd is completed. (6 sc)
Rnd 2: Inc in each 6 sc around. (12 sc)
Rnd 3: Work *1 sc in next sc, then inc. Rep from *5 more times around. (18 sc)
Rnd 4: Work *2 sc in next sc, then inc. Rep from *5 more times around. (24 sc)
Rnd 5-7: Work 1 sc in each 24 sc around. (24 sc)
Rnd 8: Work *2 sc in next sc, then dec. Rep from *5 more times around. (18 sc)
Start stuffing.
Rnd 9: Work *1 sc in next sc, then dec. Rep from *5 more times around. (12 sc) Change to COLOR B.
Rnd 10: Work *1 sc in next sc, then inc. Rep from *5 more times around. (18 sc)
Rnd 11: Work *2 sc in next sc, then inc. Rep from *5 more times around. (24 sc)
Rnd 12-14: Work 1 sc in each 24 sc around. (24 sc) 
Place safety eyes between rnd 12/13. Place first eye wherever you like, second eye 5 stitches apart
Rnd 15: Work *2 sc in next sc, then dec. Rep from *5 more times around. (18 sc)
Rnd 16: Work *1 sc in next sc, then dec. Rep from *5 more times around. (12 sc) Change to COLOR C.
Rnd 17: Work *1 sc in next sc, then inc. Rep from *5 more times around. (18 sc)
Rnd 18: Work *2 sc in next sc, then inc. Rep from *5 more times around. (24 sc)
Rnd 19-21: Work 1 sc in each 24 sc around. (24 sc)
Rnd 22: Work *2 sc in next sc, then dec. Rep from *5 more times around. (18 sc)
Rnd 23: Work *1 sc in next sc, then dec. Rep from *5 more times around. (12 sc) 
Rnd 24: Work *1 sc in next sc, then dec. Rep from *3 more times around. (8sc) Change to COLOR D.
Rnd 25-36: Work 1 sc in each 8 sc around. (8 sc)
Rnd 37: Dec in each 4 scs around. (4 sc)
End: Fasten off.


Finishing
1. Embroider mouth between the eyes. 
2. If you like apply cheeks with a Q‐tip and powdered blush just below the eyes on each side.


***This is an original pattern by ©nanaliciouz.com, 2013. All rights reserved. Please do not claim this pattern as your own. You may not in any form distribute or reproduce this pattern including images. You may keep a copy for your personal use only. Do not sell pattern and/or finished products made from this pattern without first obtaining permission from me.***

Donnerstag, 21. März 2013

How to make Pancakes

Eingestellt von nanaliciouz um 14:50 0 Kommentare

Not everybody likes pancakes with butter and maple syrup for breakfast, neither do I! But I bet you will love them with fruits and whipped cream!

To make these super fluffy pancakes you will need some preparation time, so maybe it's not an everyday breakfast. Anyway, they are still easy to make and it totally worth it!


What you need to garnish your Pancakes:
  • fruits of your choice (fresh kiwis & strawberries)
  • whipped cream
  • chocolate sauce


Pre-Preparation:
1. In a large bowl beat the whipped cream until it forms soft peaks. Fill cream into a piping bag and store in the fridge until serving time.
2. Wash the strawberries, remove the leaves and cut the fruits into slices. Put them on one half of a small plate.
3. Peel the kiwi (watch here), cut it into small square pieces and put them on the other side of the plate with the strawberries. Wrap the plate with plastic wrap and store in the fridge.

After you have done all the pre-preparation you can get to your pancakes now. This is what you need:


American Pancakes (makes approx. 12 pancakes)
adapted from chefkoch.de
 
  • 150g flour
  • 2 Tbs sugar
  • 1 packet baking powder
  • a pinch of salt
  • 3 eggs
  • 200g plain yoghurt
  • 100ml milk
  • small amount of melted butter


Preparation:
1. In a large bowl whisk togehter the dry ingredients. In a separate bowl whisk the eggs. In another bowl whisk the yoghurt and milk.  

2. Add your yoghurt-milk mixture to the eggs and whisk together until well combined. Make a well in the center of the dry ingredients and then pour in the egg-yoghurt-milk mixture and stir just until combine. You should have a thick pancake batter now.

3. Heat a frying pan. Fold a sheet of paper towel in half twice, and moisten with melted butter. Carefully rub the pan with the oiled paper towel. Pour a small amount of batter onto the pan and cook until bubbles appear, then it is lightly browned on the bottom. Turn over and brown the other side. Repeat with remaining batter.

4. Garnish the pancakes with the fruits, whipped cream and chocolate sauce before serving.

 
Bon appétit!

Samstag, 9. Februar 2013

Free pattern: Chinese New Year Clementine Amigurumi

Eingestellt von nanaliciouz um 14:52 1 Kommentare

This is my first blog post this year! Can't believe it's February already - and Chinese New Year is almost here ... time flies!

I can hardly wait to celebrate the year of the Snake with my loved ones! Holidays at my parents are the best - always lots of food!

In addition to the red packets my mom used to give me a bunch of clementines, too. I just love them, more than lai sze - they're so sweet and healthy. For me there won't be a CNY without them!

So, if you can't get these fruits at your local supermarket, grab your yarn and hook and make your own Chinese New Year Clementines!


Here's the free pattern for you - have fun and gong hei fat choi!


Materials:
  • yarn: orange (COLOR A), green (COLOR B) (I used Wolle Rödel Mille Fili Color-No. 5961 and 5946)
  • 3.00 mm crochet hook
  • fiberfill
  • plastic safety eyes, 6 mm
  • wool or tapestry needle
  • optional: stitch marker (you can use a bobby pin as a stitch marker, too!)

Stitch explanations and abbreviations:
ch chain hdc half double crochet
sc single crochet foll following
st stitch rem remain(s)(ing)
sl st slip stitch rnd round
dec sc 2 stitches together rep repeat
inc 2 sc in 1 sc * repeat  from
dc double crochet (X sc) number of single crochet in a round

Instruction for Celementine: Work in continuous rounds.
Beg: Begin with COLOR A. Start with a magic ring, ch 1.
Rnd 1: Work 6 sc in magic ring. Place stitch marker in first sc from beg of rnd, move marker up as each rnd is completed. (6 sc)
Rnd 2: Inc in each 6 sc around. (12 sc)
Rnd 3: Work *1 sc in next sc, then inc. Rep from *5 more times around. (18 sc)
Rnd 4: Work *2 sc in next sc, then inc. Rep from *5 more times around. (24 sc)
Rnd 5: Work *3 sc in next sc, then inc. Rep from *5 more times around. (30 sc)
Rnd 6: Work *4 sc in next sc, then inc. Rep from *5 more times around. (36 sc)
Rnd 7: Work *5 sc in next sc, then inc. Rep from *5 more times around. (42 sc)
Rnd 8-12: Work 1 sc in each 42 sc around (42 sc)
Rnd 13: Work *5 sc in next sc, then dec. Rep from *5 more times around. (36 sc)
Place safety eyes between rnd 12/13. Place first eye wherever you like, second eye 8 stitches apart. Start stuffing.
Rnd 14: Work *4 sc in next sc, then dec. Rep from *5 more times around. (30 sc)
Rnd 15: Work *3 sc in next sc, then dec. Rep from *5 more times around. (24 sc)
Rnd 16: Work *2 sc in next sc, then dec. Rep from *5 more times around. (18 sc)
Rnd 17: Work *1 sc in next sc, then dec. Rep from *5 more times around. (12 sc)
Rnd 18: Dec in each 6 scs around. (6 sc)
End: Fasten off.

Instruction for Leaf (make 2):
Beg: Begin with COLOR B, ch8.
Rnd 1: Sl st into 2nd ch from hook. The foll st will work down one side of the ch:
1 sc in the next 2 ch, hdc in next ch, dc in next 2 ch, 2 sc in last ch.
Rnd 2: The rem st will work up the other side of the ch back to where you started from:
dc in next 2 ch, hdc, sc in next 2 ch, sl st. (sl st, 12 sc, sl st)
End: Leave long thread for sewing on. Fasten off.


Finishing
1. Place leaves on top of the clementine and sew them on. 
2. Embroider mouth between the eyes. 
3. If you like apply cheeks with a Q‐tip and powdered blush just below the eyes on each side.


***This is an original pattern by ©nanaliciouz.com, 2013. All rights reserved. Please do not claim this pattern as your own. You may not in any form distribute or reproduce this pattern including images. You may keep a copy for your personal use only. Do not sell pattern and/or finished products made from this pattern without first obtaining permission from me.***
 

Nanaliciouz Template by Ipietoon Blogger Template | Gadget Review